Deploy CodeScene on AWS Marketplace
If you are on AWS, you can deploy CodeScene on an EC2 instance easily by using one of our Marketplace products
Contract Pricing (pay upfront) option: https://aws.amazon.com/marketplace/pp/prodview-vxusmqx3xjnik - Choose this option if you want to pay via your AWS account
Bring Your Own License (BYOL) option: https://aws.amazon.com/marketplace/pp/prodview-ntvelrsldgmei - Choose this option if you want the most subscription/payment flexibility and can manage payments outside your AWS accounts.
We recommend you choose the Pro plan since that offers all the features including REST API, PM tools (e.g. Jira) integration, etc. It also avoids complications with later plan changes (applies to the ‘Contract Pricing’ option).
Subscribing
First, you need to subscribe to the selected product. Below we show the Contract Pricing option because that is more complicated - with BYOL, you don’t choose any parameters and continue with Deployment straight away.
Deployment
The deployment is fully automated via the provided CloudFormation template.
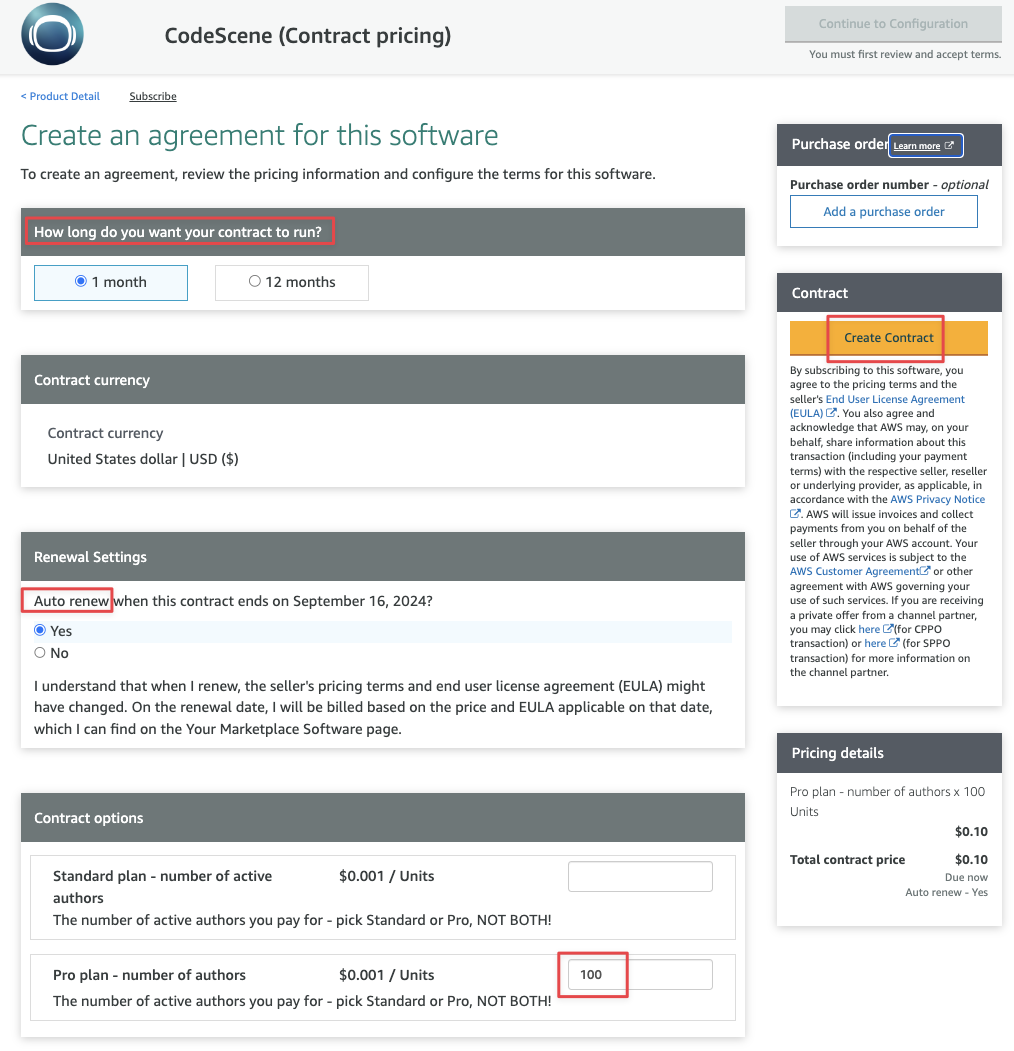
Create Contract (Contract Pricing only)
Visit our Contract Pricing product page
Set proper parameters (contract length, auto-renewal, plan and active authors count)
Click Create Contract
Configure the product before launching
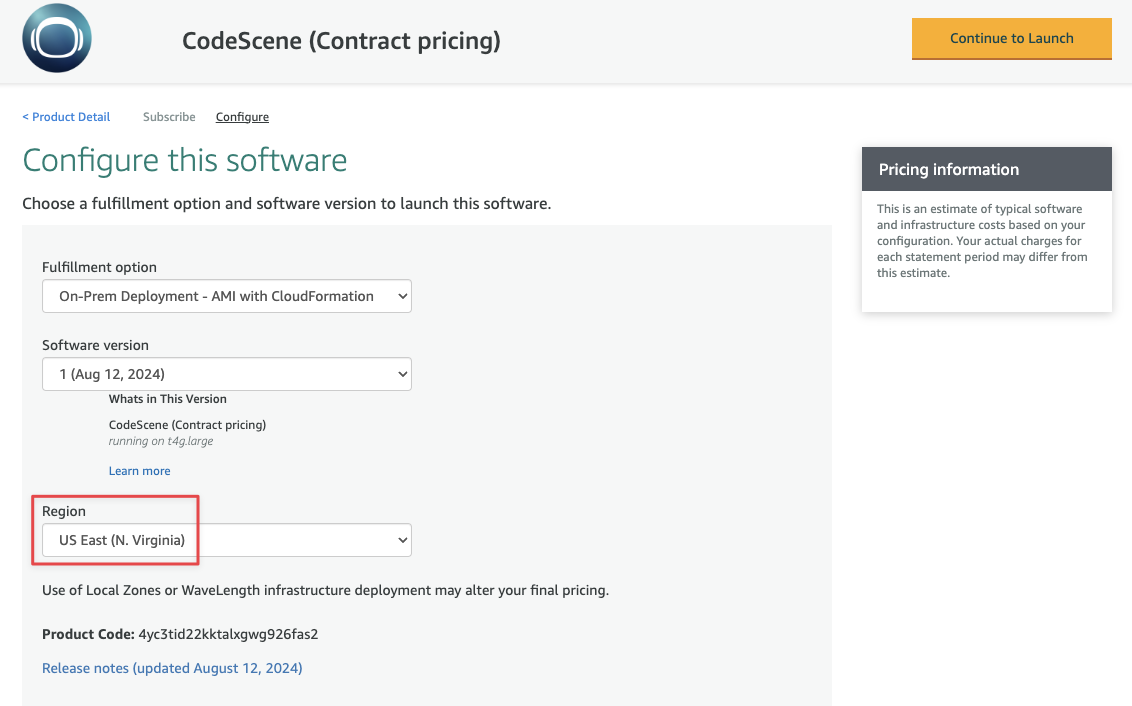
After you subscribe, click the Continue to Configuration button:

Make sure the latest version of the product is selected, choose the proper AWS region, and click Continue to Launch:
You will see a summary of your product configuration You can also view Usage instructions to learn about accessing the CodeScene app, login, configuration, and version updates.
After you review all the information, click Launch.
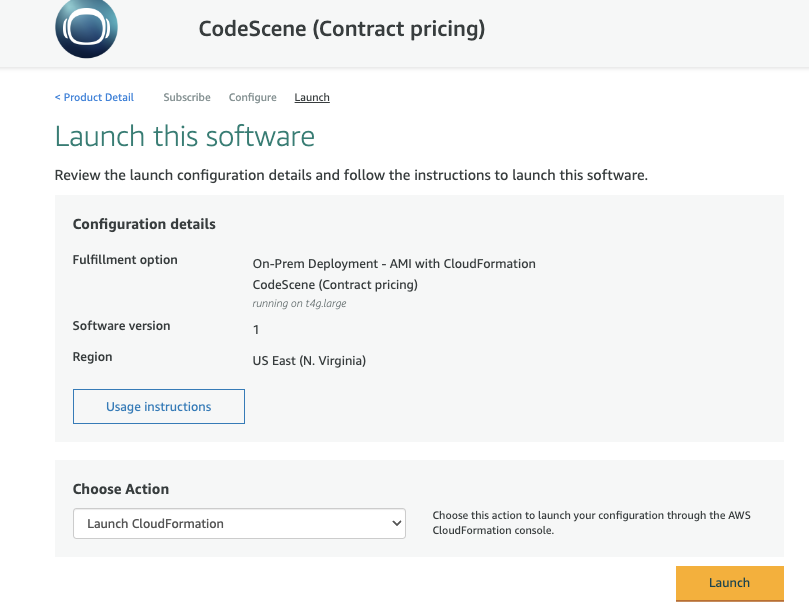
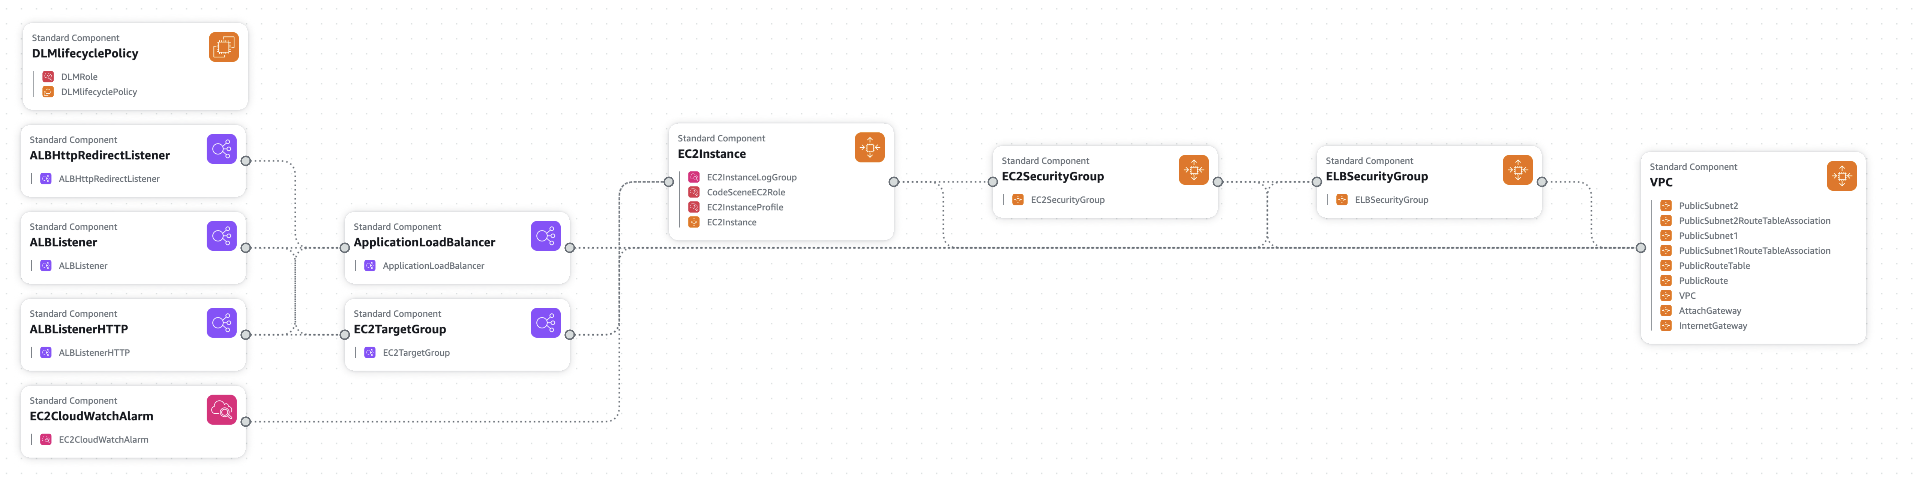
A new window will open with a preselected CloudFormation template.
Launching the CloudFormation stack
On the Create stack page, the CloudFormation template is preselected.
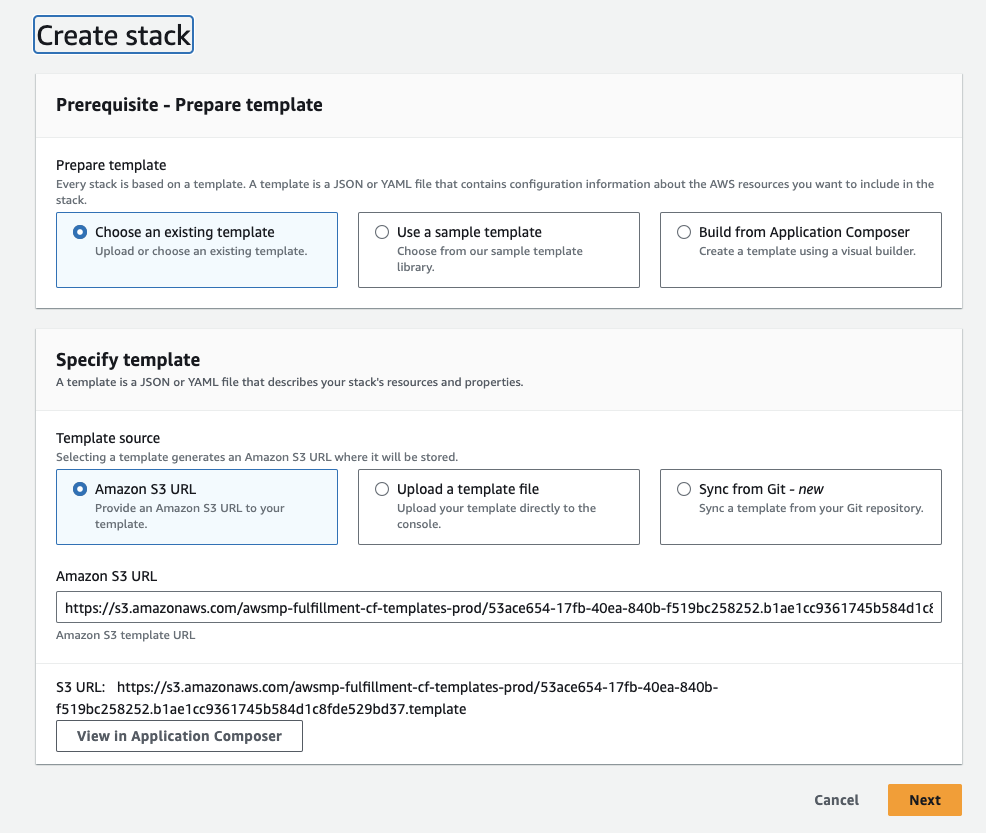
You can click View in Application Composer if you want to see the infrastructure components in detail.
When you’re ready, Click Next.
You will need to specify a unique stack name and fill in the template parameters.
Please review Usage instructions in our product listing relevant to configuration and deployment - for convenience, the information is summarized below:
The product requires an Internet connection for deployment and continuous use of the product
The following external services are required to properly function: https://portal.codescene.com/
An IAM role (CodeSceneEC2Role) is created during deployment for communication with AWS License Manager (to fetch Contract license info), to deliver logs to CloudWatch, and for secure connections to the instance via Session Manager (SSM).
You need to decide whether you want to create a new VPC and subnets (the default) or you want to re-use an existing network infrastructure. To deploy into an existing VPC, fill in the ExistingVPCId, ExistingPublicSubnet1, and ExistingPublicSubnet2 parameters.
Note that HTTPS is enforced and you MUST set the CertificateARN parameter.
The certificate must be created separately by your infrastructure team - our CloudFormation template does not include it
Check AWS docs fore more details: https://docs.aws.amazon.com/acm/latest/userguide/gs.html
The IngressIP template parameter specifies the IP ranges allowed to access the product (load balancer)
PR Integration , one of our essential features, requires an open network route from your Git provider (such as GitHub, BitBucket, GitLab, or Azure DevOps) to the CodeScene app in order to receive webhooks events.
If you use an on-premise installation of a Git provider (such as GitHub Enterprise) then you can restrict the incoming traffic to your IP ranges.
If you use a publicly hosted Git provider (such as github.com) then you need to either allow all traffic from all IP addresses by using “0.0.0.0/0” (less secure) or periodically update the load balancer’s security group based on the provider’s published IP ranges (e.g. https://api.github.com/meta ).
Instance size is an important consideration - We recommend 4+ vCPUs and 8+ GB RAM
if you will have many projects and run many analyses, we recommend avoiding burstable (T) instances to avoid running out of credits which could severely degrade the performance
if you plan to analyze large codebases, we recommend 16+ GB RAM and enough CPUs - e.g. the m7g.xlarge instance.
see also Deployment Options
Configure domain name for CodeScene (recommended)
This is an optional step but you will want to complete it in most cases.
Without a custom domain, your users would need to use the load balancer’s DNS name to connect to CodeScene which is problematic because
the attached TLS certificate most likely won’t be valid presenting a security risk and awkward error message to the end users
the domain will change if you redeploy the load balancer
Therefore, we recommend creating a new DNS A record for CodeScene, such as codescene.mycompany.com, preferably in Route 53:
Go to the Route 53 console and choose the proper hosted zone
Click “Create record”
Choose “Simple routing” and click “Define simple record”
Pick “A - Routes traffic to an IPv4 address and some AWS resources”
Set “Value/Route to” to “Alias to Application and Classic Load Balancer”
Choose proper region and the corresponding load balancer
See https://docs.aws.amazon.com/Route53/latest/DeveloperGuide/routing-to-elb-load-balancer.html for more details.
First login (Contract Pricing only)
After a successful deployment, CodeScene is ready for use. You can log in by using the default admin account “aws.marketplace” with the EC2 instance ID as the password.
TIP: look in the CloudFormation stack’s resources to quickly find the instance ID.
After the login, consider applying the suggestions displayed on the login screen, that is
Create a new admin user and remove the default “aws.marketplace” user
Update the default login message
You can do both in Configuration -> Authentication.
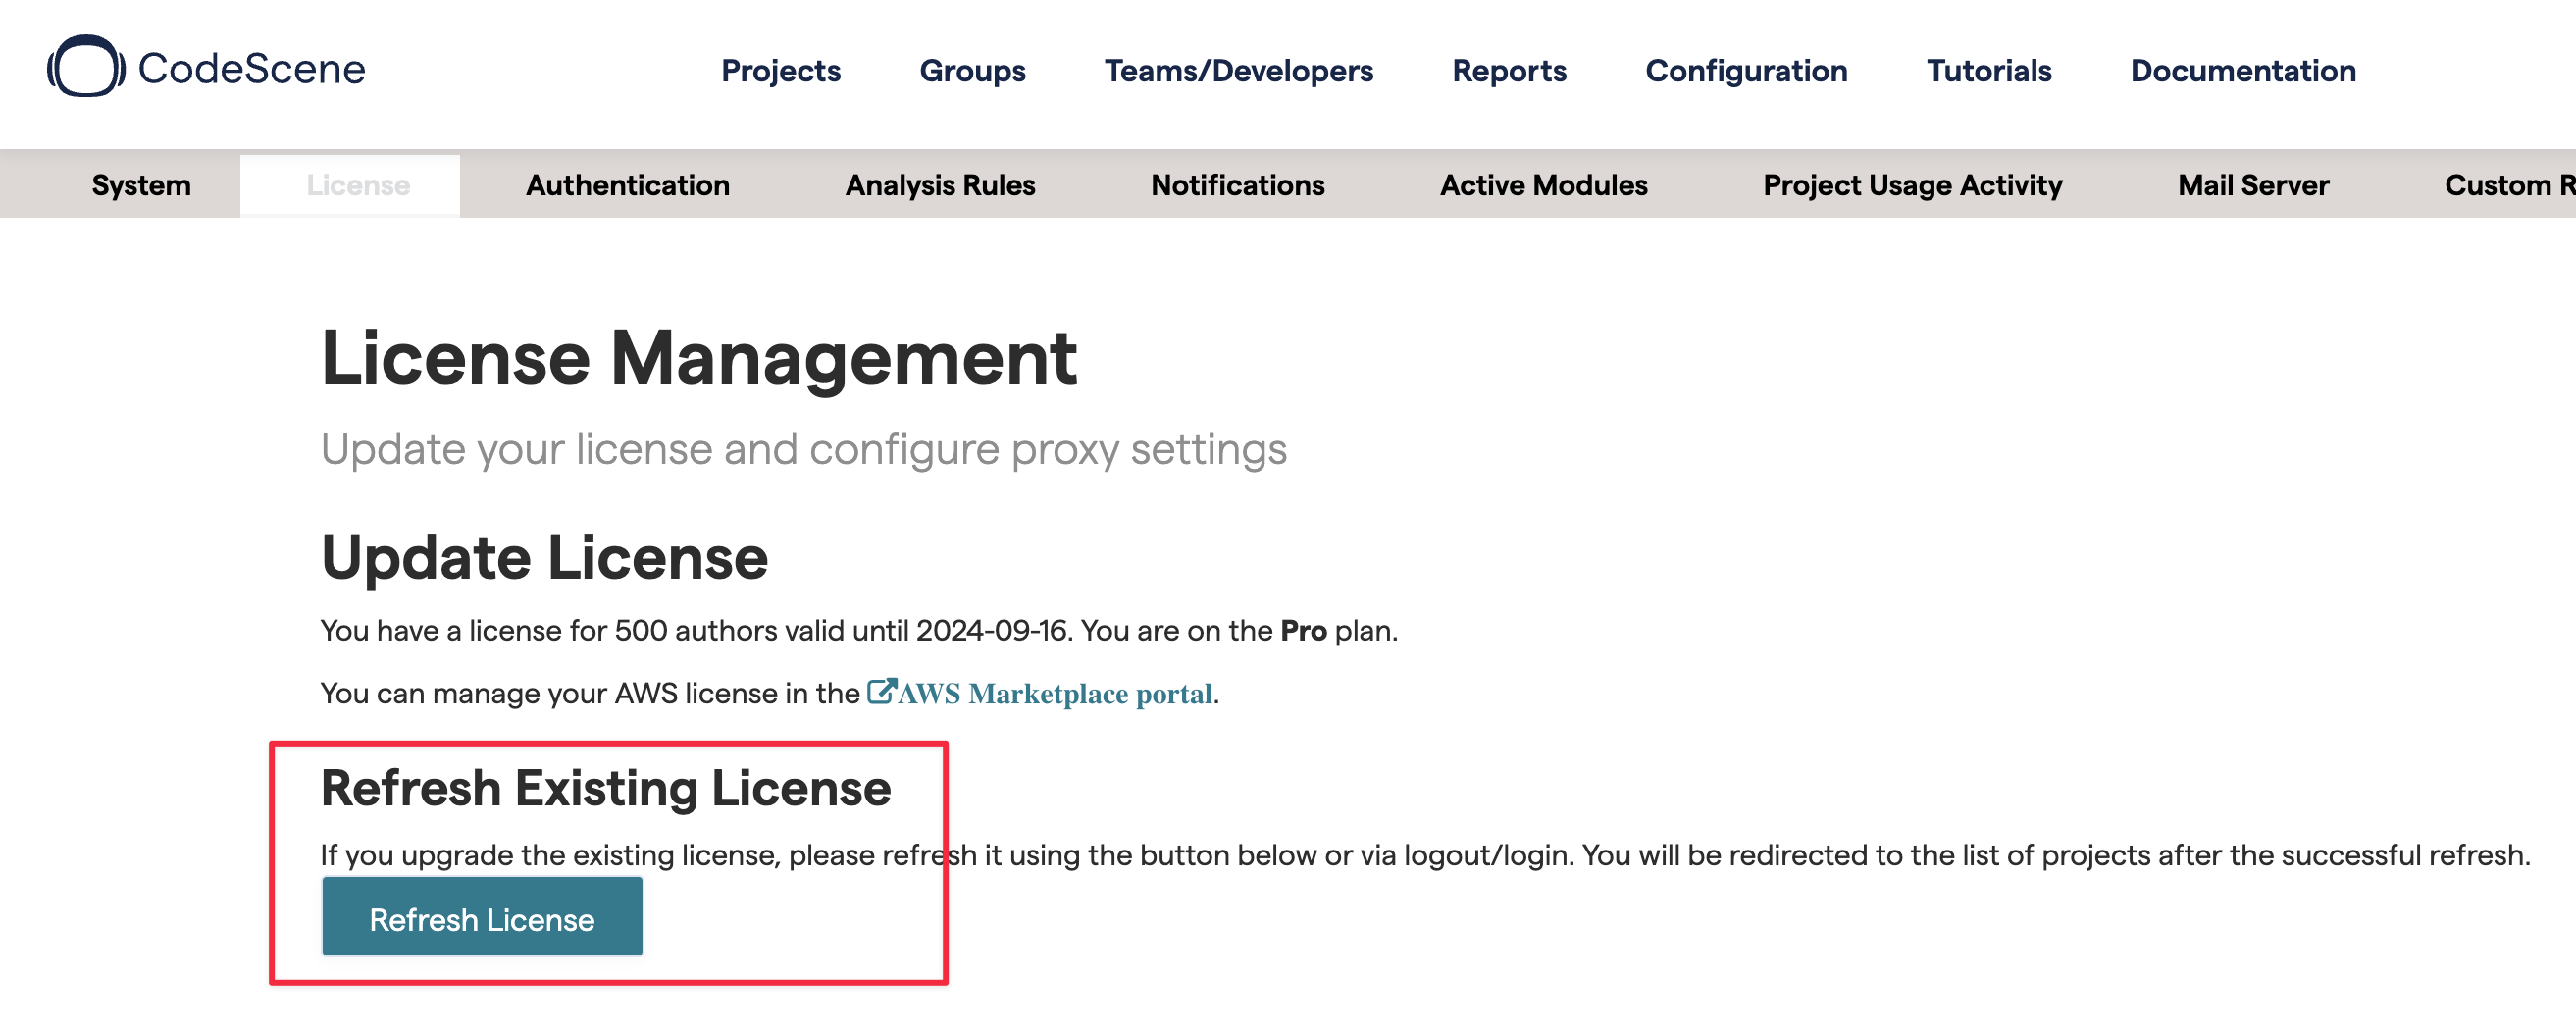
After a modification of your product is complete, the changes should be reflected in the app within an hour. You can also manually refresh the license in the configuration:
Creating and analyzing projects
Once the deployment, login, and follow-up configuration tasks are done, you can create a new project and analyse your repositories.
An SSH key is automatically generated for you during installation. You will need to add the public portion of this key to your git repo provider (such as GitHub). Specifically, you will need this command to display the public key
docker exec -it -u codescene [CONTAINER] ssh-keygen -y -t ed25519 -f "/codescene/.ssh/id_ed25519"
Consult our Git repository access docs to learn more about how to configure CodeScene to access private repositories.
Infrastructure management & Monitoring
Backups (DLM)
There’s a Data Lifecycle Manager (DLM) policy deployed with the CloudFormation stack.
This policy backs up the CodeScene’s instance EBS volume every 24 hours (by default).
You can find these snapshots in EC2 console -> Elastic Block Store -> Snapshots under the name “CodeScene Backup”.
NOTE: at most 30 snapshots are retained - anything older is deleted automatically by DLM.
Logs (CloudWatch)
Your CodeScene instance will automatically send logs to the codescene log group. The retention of the log group is 365 days.
To access the logs:
Go to the CloudWatch console and make sure the proper region is selected.
On the left, select “Logs Insights” (or “Log groups” if you prefer the old interface)
Choose the codescene log group in the dropdown at the top.
Write your log query and hit ‘Run query’ to display the matching logs
A very simple Logs Insights query may look like this:
fields @timestamp, @message
| sort by @timestamp asc
| display @message
Connecting to the EC2 instance
To update CodeScene to a newer version or troubleshoot problems, you will need to connect to the instance:
Find the instance in the EC2 console
Right click and choose “Connect”
Select the “Session Manager” tab and click “Connect”
Once you are connected, you can switch to the ec2-user to make your life easier
sudo su ec2-user
cd ~/codescene
Updating to a newer CodeScene version
To update to the latest CodeScene version, connect to the EC2 instance (see the previous section and run the following script
chmod +x /home/ec2-user/codescene/codescene.sh # needed only for the first time
/home/ec2-user/codescene/codescene.sh update
A db backup is created automatically and stored in the codescene docker volume (in /codescene/db-backups/ directory).
Subscription management (Contract Pricing only)
You manage your license/subscription solely through AWS Marketplace:
Visit the product page
Click View purchase options
Scroll down and find the Contract options section
Downgrades and Plan changes (imply contract cancellation and new contract)
AWS Marketplace restricts customers from decreasing the number of units they pay for.
For that reason, it is not normally possible to decrease the number of authors you chose when creating the contract. In the same way, you cannot change your plan from Standard to Pro (or vice versa) without subscribing to both at the same time! (which generally doesn’t make sense and is discouraged)
To overcome these limitations, you will need to cancel your current contract:
Select the checkbox “Yes, I want to cancel my automatic renewal …” in the Renewal Settings section.
Wait until the end of the current term.
Once the contract is cancelled, subscribe again using the proper plan and the correct number of authors.
Contact Us (sales@codesene.com ) if you wish to complete the whole process before the end of the current term or if you want to get a refund (see the next section).
Refunds and Immediate cancellations
AWS Marketplace seller guide explains the details of the AWS Marketplace product refund process .
We’ll need the following information from you:
The email address that is associated with their AWS account.
The AWS account number of the account used to subscribe to your product
if you are the payer of an organization, you need to provide the AWS account ID for the linked account subscribed to our product.
The billing periods for which you would like a refund.
A typical of requesting a refund is a plan change from Standard to Pro - otherwise you would need to pay for both dimensions for the rest of the billing term.
Termination
If you no longer use CodeScene you can cancel the contract and delete the underlying infrastructure resources.
Delete infrastructure resources
The easiest way to remove all the resources is to delete the associated CloudFormation stack.
Before you can do that, you need to disable EC2 instance termination protection.
Select proper region in the AWS console
Find the instance in the AWS EC2 console
Right-click on it and choose Instance settings -> Change termination protection
Uncheck the “Enable” checkbox
Then you can proceed with deleting all the resources:
Go to Cloudformation -> Stacks
Select the relevant stack and click Delete
Wait until the operation completes
EBS volumes
Deleting the CloudFormation stack won’t remove the EBS volume attached to the CodeScene instance. You can keep this volume around to easily recover your CodeScene instance.
If you do want to delete absolutely everything, then you must remove the volume(s) manually as well as removing the EBS Snapshots made by DLM - search for “CodeScene Backup”