Getting started with Code Coverage in CodeScene
CodeScene does not generate code coverage data itself but provides a platform to visualize and explore your project’s results. Code coverage data can be produced using various tools that are typically language-specific. These tools generate coverage data in different file formats. Ensure that the tool you choose outputs coverage data in a format supported by CodeScene.
Supported formats and metrics
CodeScene’s code coverage solution supports multiple coverage tools and formats.
Format |
Metrics |
|---|---|
|
line-coveragebranch-coveragefunction-coverage` |
|
|
|
line-coveragebranch-coverage |
|
line-coveragesequence-point-coveragemethod-coveragebranch-coverage |
|
line-coveragemethod-coveragecondition-coveragestatement-coverage |
|
line-coveragestatement-coverage |
|
line-coveragesequence-point-coverage |
|
line-coveragemethod-coveragecondition-decision-coveragedecision-coverage |
You can add multiple coverage metrics for one repo, and each of them will show up as a separate tab on the interactive hotspot map.
Uploading Code Coverage Data to CodeScene
The result files generated by these tools as part of a build pipeline are uploaded to CodeScene using the CodeScene Coverage CLI tool.
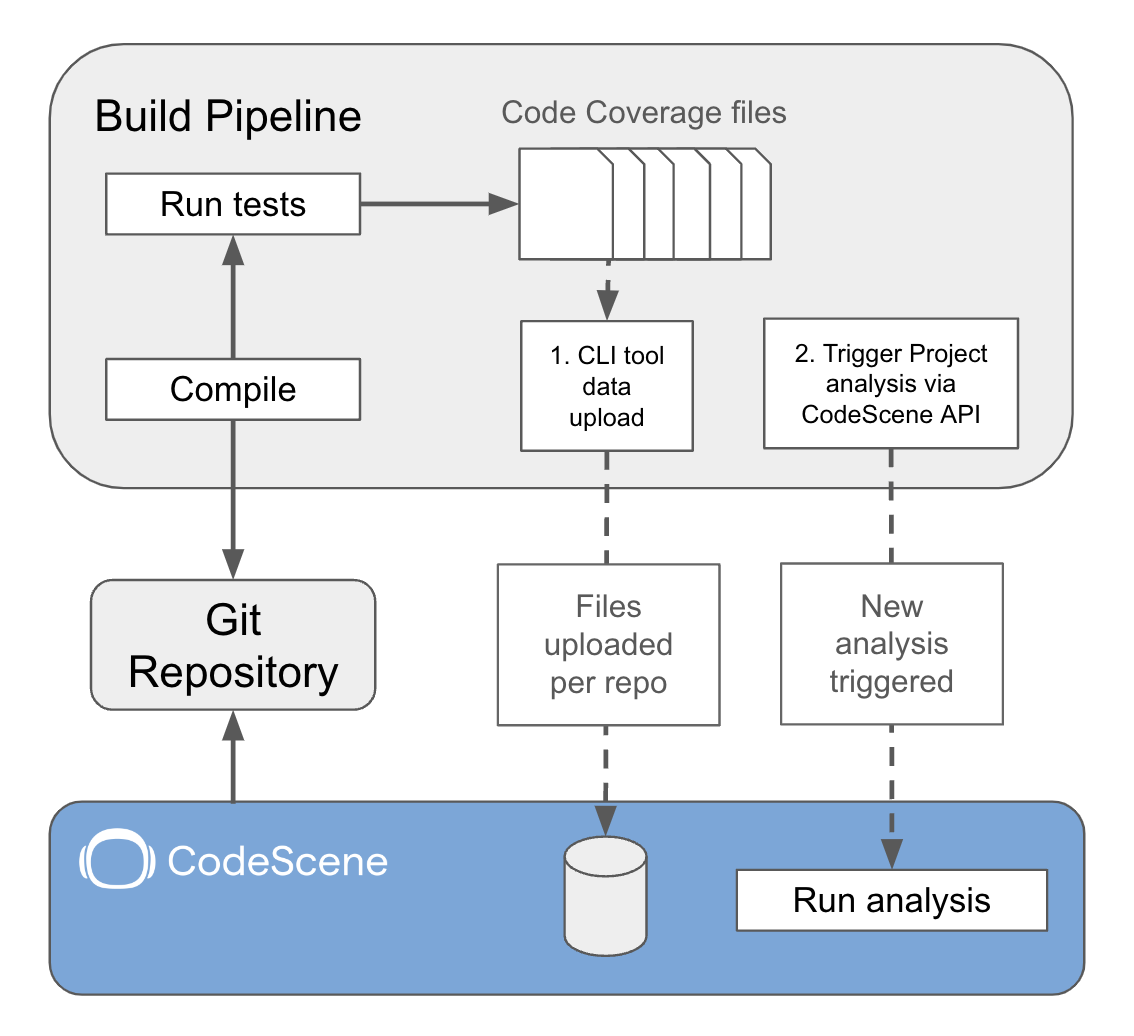
Fig. 73 The coverage results are generated as part of a build pipeline and uploaded to CodeScene.
The coverage data in CodeScene is not tied to a specific project. Instead, uploading coverage data for a repository means it will automatically be available for all projects analyzing that repository. But to be used, the data needs to be relevant to the commit being analyzed in CodeScene. The following restrictions apply to how coverage data is used during analysis:
Coverage data will only be used during analysis if the coverage data was produced for the same or an ancestor commit. After project analysis you can check the eventually warnings in the Project Dashboard -> Scope -> Analysis Data -> Analysis Warnings
If the coverage data is for an ancestor commit, data won’t be shown for files that have changed since that commit.
CodeScene will not merge coverage data for a single file from different uploads. If several uploads contains data for the same file, the most recent (applicable) one will be used.
Uploaded coverage data will only be visible in the Project Dashboard if a new analysis is executed for it, see Trigger New Project Analysis.
Triggering a New Analysis For a Project
 curl -X POST -H 'Accept: application/json' -H 'Authorization: Bearer <token>' \
 'http://localhost:3003/api/v2/projects/{project-id}/run-analysis'
Replace
{project-id}with a valid id taken from the project list results.
Example for GitHub Actions using the CodeScene CLI Coverage Tool
To upload code coverage data to CodeScene from a build pipeline, add an upload step after running the test tool that generates the coverage data.
In the Github action you can add a step for download (see: Manual installation) and unzip the CLI Coverage Tool or to use the install script by adding a step similar to this:
- name: Install cs tool
  run: curl https://downloads.codescene.io/enterprise/cli/install-cs-coverage-tool.sh | bash -s -- -y
- name: Upload coverage data to CodeScene
  run: cs-coverage upload --format "lcov" --metric "line-coverage" "coverage/code-coverage.lcov"
  env:
    CS_ONPREM_URL: ${{ secrets.CS_ONPREM_URL }}
    CS_ACCESS_TOKEN: ${{ secrets.CS_ACCESS_TOKEN }}
Example for manual upload using CLI Coverage Tool
Manual uploading Code Coverage data to CodeScene require installation of the CLI Coverage Tool .
On Windows Using PowerShell
cd /path/to/your/project/
$Env:CS_ONPREM_URL="http://your.codescene.com"
$Env:CS_ACCESS_TOKEN="<your pat token>"
cs-coverage upload --format "lcov" --metric "line-coverage" "coverage/code-coverage.lcov"
On Linux/Mac Using terminal
cd /path/to/your/project/
export CS_ONPREM_URL="http://your.codescene.com"
export CS_ACCESS_TOKEN="<your pat token>"
cs-coverage upload --format "lcov" --metric "line-coverage" "coverage/code-coverage.lcov"
Excluding false positives from the code coverage analysis
In some cases, code coverage data might not be available for all the files in a project. Common situations where this could arise are:
In a project with multiple programming languages, code coverage tools may not be set up for all of the languages yet.
In a project with multiple repositories, the generation and uploading of code coverage data might not be set up for all of the repositories yet.
When no coverage data is available, by default CodeScene considers the files to have 0% coverage. Those files would therefore appear in red inside the system map and the 0% scores would have a negative impact on the code coverage averages that CodeScene displays. This is what we mean by “false positives” for low code coverage.
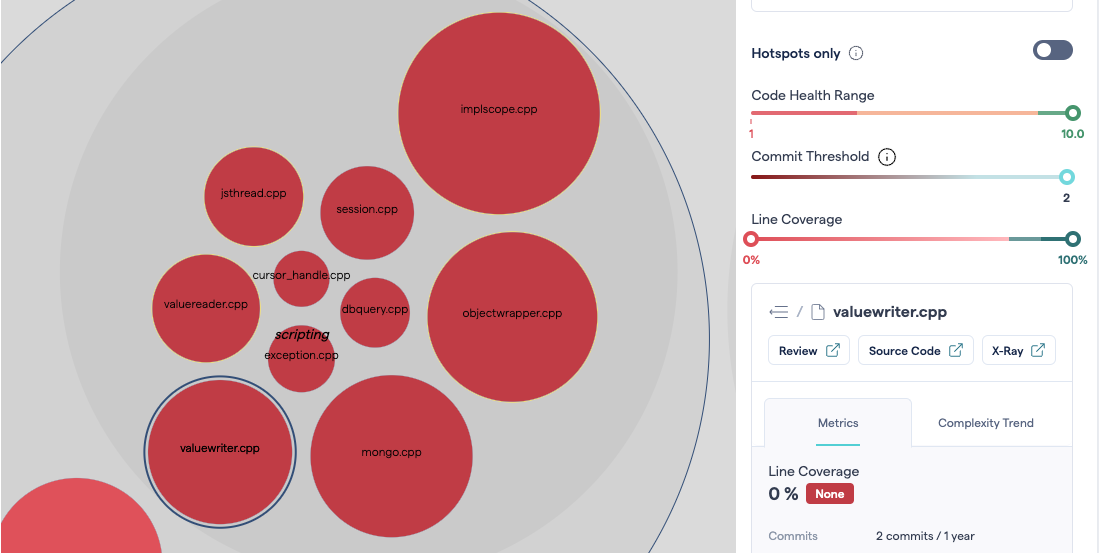
Fig. 74 A folder containing multiple files marked as having 0% code coverage. A code coverage problem, or false positives?
To avoid this, you can configure CodeScene to remove certain files and folders from the code coverage analytics. Go to the Exclusions and filters tab of the project configuration. There, you can define exclusions using glob patterns relative to the repository root of the files.
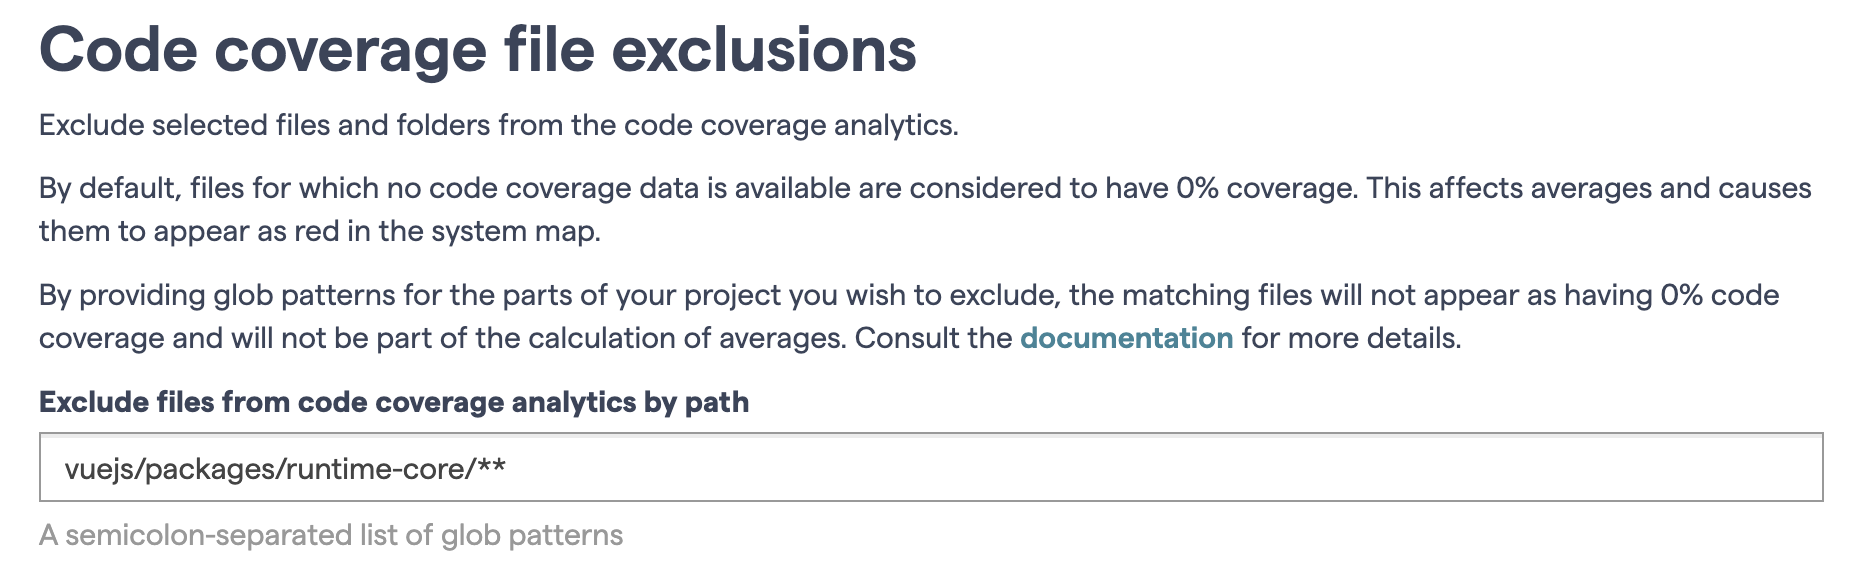
Fig. 75 Configure the code coverage exclusions.
In general, these patterns work the same way as the other file exclusions. See Exclude Specific Files and Folders from an Analysis for details. Please note, however, that glob patterns matching the repository root itself must begin with either the complete repository root, e.g. my-repo/path/file.c, one or two asterisks, e.g. */path/file.c or **/path/file.c, or a combination of one asterisk and other characters. Double asterisks combined with other characters in the repository root are not allowed. Thus repo-*/path/file.c will work but repo-**/path/file.c will be ignored.
Excluded files will appear as grey circles in the system map. Their scores will not influence the code coverage KPIs and averages. For all the other metrics besides code coverage, these files will continue to be analyzed normally.
Note that files that are excluded from the analysis do not need to be excluded again here.
Creating code coverage data
As stated above CodeScene doesn’t generate the code coverage data. There are several alternative tools to generate these files depending on your code language. Please refer to each tool’s specific instructions for setting this up for your repositories.
Troubleshooting
ensure you are calling the CLI tool from your project root, the CLI will automatically fetch project metadata for you;
ensure the ENV vars are properly set, see: Client setup;
ensure the project from where you run the CLI tool is pointing to same branch and commit as the project CodeScene is analysing;
if you generate code coverage locally ensure you have used same repo url on CodeScene project and when you clone the repo locally;
ensure you trigger a new analysis after code coverage data upload;
verify what coverage data has been uploaded using api, see: List Data;